If it’s of use to anyone, my first recipe:
First Foray into the Reclaim Cloud (Beta) – Running a Personal Jupyter Notebook Server
If you give it a go and any steps are wrong, or lacking, please post a comment either here or direct to the blog.
If it’s of use to anyone, my first recipe:
First Foray into the Reclaim Cloud (Beta) – Running a Personal Jupyter Notebook Server
If you give it a go and any steps are wrong, or lacking, please post a comment either here or direct to the blog.
Good stuff! I’d say you managed to accomplish quite a bit for someone who dived in without really knowing anything about the system! Two quick notes:
Setting custom endpoints is only necessary if the container you spin up doesn’t have a dedicated IP. Any container that has a public IPv4 can address any exposed port from the containers as it bypasses the shared load balancer the system uses to proxy all traffic from those subdomains to your containers.
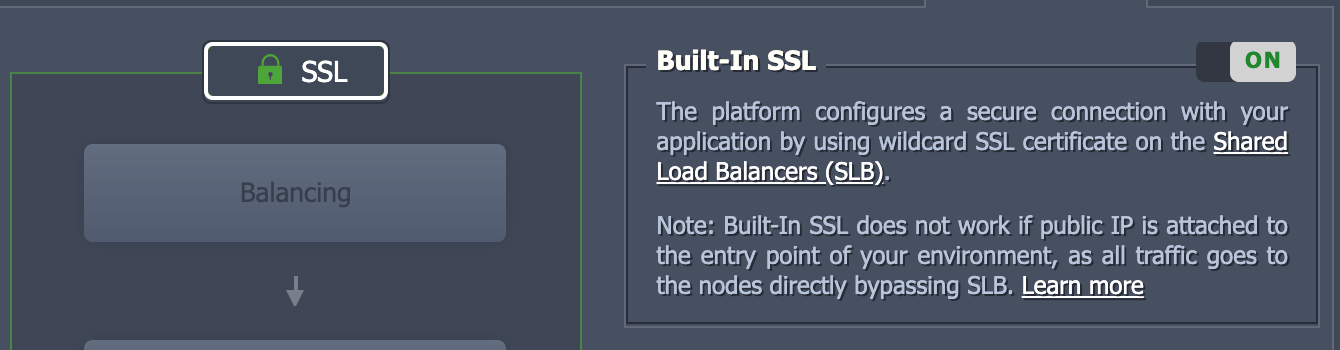
Let’s Encrypt is great if you are mapping a custom domain, but if you’re just running containers off the subdomain of reclaim.cloud you can actually use a shared wildcard SSL built into the system You just go back to your environment and click SSL at the top of the stack and enable it here:
I imagine you’ll be diving into custom scripts at some point as it gets a bit at some of your ideas of making easily distributable packages. I’m going to start a new thread here to compare notes and share what people are scripting out.
Re: [quote=“timmmmyboy, post:2, topic:3021”]Setting custom endpoints is only necessary if the container you spin up doesn’t have a dedicated IP. Any container that has a public IPv4 can address any exposed port from the containers as it bypasses the shared load balancer the system uses to proxy all traffic from those subdomains to your containers.
[/quote]
I’m wondering why I didn’t check :8888… Doh! Are you suggesting that that would have been exposed anyway? In any case, it makes things nicer if the only port I want to share is mapped to default 80. Is the endpoint route the way to do that, or is there another way, eg in the load balancer somwhere?
Re: SSL: hmm, I thought I had enabled that? I need to fire up a server. If the port :8888 was open, are you saying that enabling that build in SSL would have let https://IP:8888 work? With the mapping and default SSL, would I still also need to map 443:8888 via an endpoint?
FOllowing up on another point over the twitterz re config files that can be uploaded and used to create an environment, a pretty literal translation of your RStudio script let me launch my container:
type: install
id: tm129test
name: TM129 test
homepage: https://github.com/innovationOUtside/tm129-robotics2020/
baseUrl: https://raw.githubusercontent.com/ousefulReclaimed/tm129test/master
logo: oi_utils.png

description:
  text: Test notebook envt

categories:
- apps/popular
- apps/dev-tools
- apps/e-learning

globals:
  JUPYTER_TOKEN: ${fn.password}

nodes:
  nodeType: dockerengine
  nodeGroup: cp
  cloudlets: 16
  extip: false
  displayName: TM129 test
  env:
      JUPYTER_TOKEN: ${globals.JUPYTER_TOKEN}

onInstall: setup

actions:
  setup:
    cmd[cp]: |-
      docker run -d -p 80:8888 \
      -e JUPYTER_TOKEN=${globals.JUPYTER_TOKEN} \
      --name tm129test \
      --restart=always \
      ousefuldemos/tm129-robotics2020:latest

      #Checking of container is up and running
      until [ "`/usr/bin/docker inspect -f {{.State.Running}} tm129test`"=="true" ]; do
        sleep 1
        print '.'
      done;

      echo OK

ssl: true
skipNodeEmails: true

success: |
  **Juyter notebook URL**: [https://${env.domain}/](https://${env.domain}/)
  **Token**: ${globals.JUPYTER_TOKEN}
Only faff was trying to find the password when I missed the display message; but I think the above sets it as an env var that can look up from container {variables} (not checked); which means I should also be able to drop the -e arg in my docker start command.
Tony,
So, If I am understanding this you could have a one-click app for students based on the environments you want them to work within, is that right?
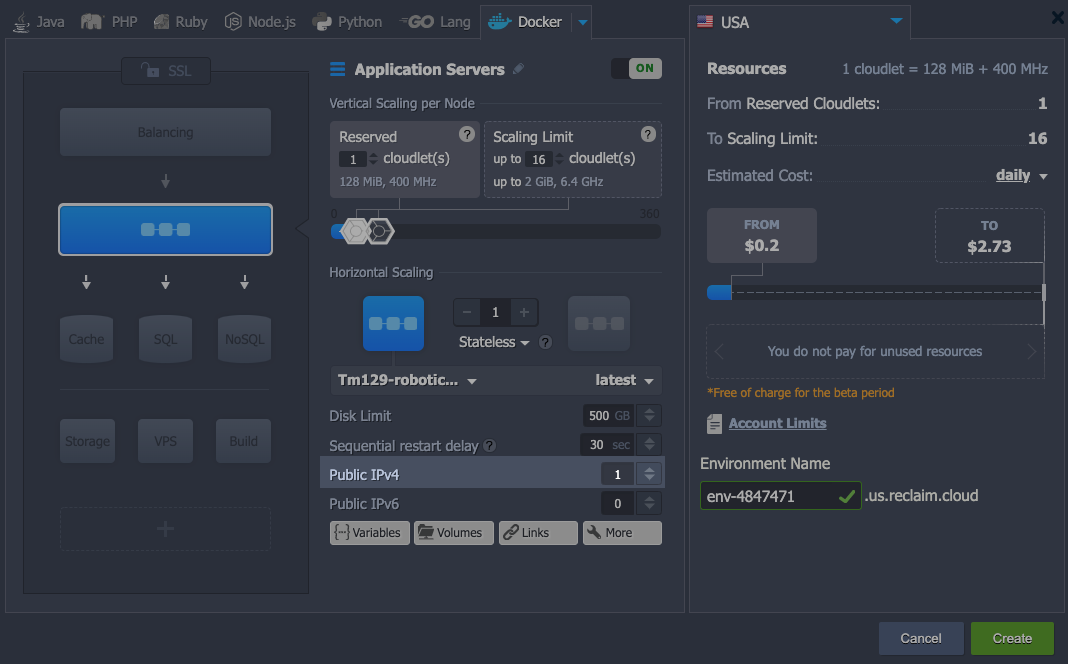
From your original screenshots you did not have a public IP address enabled. It would be turned on here:
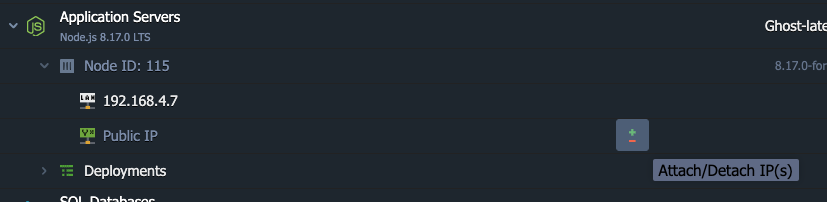
Or after having created the environment by expanding the particular node you want to add an IP to and adding it here:
But yeah, that bypasses the need for the whole Endpoints thing since you don’t then have to worry about port conflicts so it exposes anything that the container is setup to expose.
This I’m not 100% sure on. I don’t believe I’ve ever had to map port 443 in a container so I think the proxy is handling that automatically, but I do recall with one app I had a bear of a time getting the internal SSL traffic to talk to an external cert. In my experience it works best if all container traffic is non-SSL and then secured at the environment level or the container provisions and manages its own cert and handles all SSL traffic internal and external. Need to test more here.
So, a repo like GitHub - innovationOUtside/tm129-robotics2020: Repo to explore the drafting of updated robotics activities for OU module TM129 is intended to achieve certain things.
Now there is also:
Obvs that’s really clunky… ideally, there’d be a button pasted into readme that could autolaunch an envt for a logged in Reclaim Cloud user, eg that pointed to reclaim.cloud?launchFromConfigURL=RAW_FILE_URL
Even better if Reclaim Cloud could (offer to) redirect you to a running envt if you’ve already spun one up.
What I’m partly trying to work towards is a template for a repo that lets you trivially define a computational environment (eg using repo2docker environment definition conventions) and then you get containers that:
Reclaim Cloud now offers another option for (user-)admins, with the launch simplified via the config file.
What might be interesting to consider is how Reclaim.Cloud could build direct from a repo using repo2docker style mechanisms; one way would be to use the GitHub - plasmabio/tljh-repo2docker: Plugin for The Littlest JupyterHub to build multiple user environments with repo2docker approach, although that might require some fiddling around w/ docker socket settings (beyond me…); or a Binderhub with persistence setup GitHub - gesiscss/persistent_binderhub: A Helm chart repo to install persistent BinderHub ; that latter uses k8s / helm, so could be worth trying out as a Docker.Cloud k8s image. K8s still beyond me and not sure I have any creative energy spare to learn that right now (or for foreseeable future, which has about a rolling 2 week horizon for me atm!)
Re: no public IP address: I was accessing something via the URL associated with the envt, which was a public URL and that I got “for free” (i.e. I didn’t consciusly set anything)?
That’s right, the system uses a “Shared Load Balancer” where public URLs are provisioned and proxied to private IP ranges for various containers. The shared load balancer proxies particular ports like 80, 8080, and a few others automatically. A public IP address would assign a dedicated IP to the particular container which then bypasses the shared load balancer and all traffic is no longer proxied but sent directly back and forth to the container. Public IP vs Shared Load Balancer | Virtuozzo Ops Docs
Keeping stuff in one thread: via @timmmmyboy on Twitter, with manifest at a URL, we can create and launch an environment from it:
The Jelastic API looks like lots of things can be handled through the API to. Does the manifest= arg accepted an encoded JSON object as well as a URL?
[Answered] https://docs.jelastic.com/application-installation-widget See Widget Testing:
https://app.{hoster_domain}?manifest={manifest_code} where {manifest_code} is compacted/URL encoded content of manifest JSON file or link to JSON file with your manifest.
First attempt at trying to get JupyterHub running;
@psychemedia I tried spinning this up in a clean Docker Engine, and once I ran the compose command I got the following error during the installation process:
Step 3/4 : RUN wget https://raw.githubusercontent.com/jupyterhub/jupyterhub/0.9.3/examples/cull-idle/cull_idle_servers.py
 ---> Running in 168aba432b71
/bin/sh: 1: wget: not found
ERROR: Service 'jupyterhub' failed to build: The command '/bin/sh -c wget https://raw.githubusercontent.com/jupyterhub/jupyterhub/0.9.3/examples/cull-idle/cull_idle_servers.py' returned a non-zero code: 127
Not sure where I went wrong, but wondering if I needed to choose the option in the Docker Engine to use a compose.yml URL, although seems like running it at SSH should have worked.
Looks like that was either an old version of my files or you didn’t pull the right branch. No wget in current version?
git clone --branch reclaim https://github.com/ouseful-testing/jupyterhub-docker/
cd jupyterhub-docker
docker-compose up -d
I just re-tried it using the commands here and got the same wget error. Acknowledging it could be me ![]()
Ah, ok, I’d changed the base image from the original and new one doesn’t have wget. So fix is to just add it. Should work now?
(By the by, nano editor works in web terminal so you could just edit Dockerfile that’s currently there to fix the missing wget dependency.)
As an exercise for the reader, and on my to do list but I really have to get some OU work done for rest of today now, is customising the look and feel of the JupyterHub pages:
If you just want to launch an Jupyter official Jupyer stack container, the easiest way might be from a templated repo.
I made some notes on a simple example here — GitHub - ousefulReclaimed/minimalJupyterNotebook: Minimal personal Jupyter notebook launch — using a minimal Jupyter notebook server.
I just upgraded a version of my docker-compose/jupyterhub recipe, along with some docs, here: GitHub - ousefulReclaimed/jupyterhub-docker: A configuration for a JupyterHub+DockerSpawner+First Use Authenticator server for use on Reclaim.Cloud using docker-compose
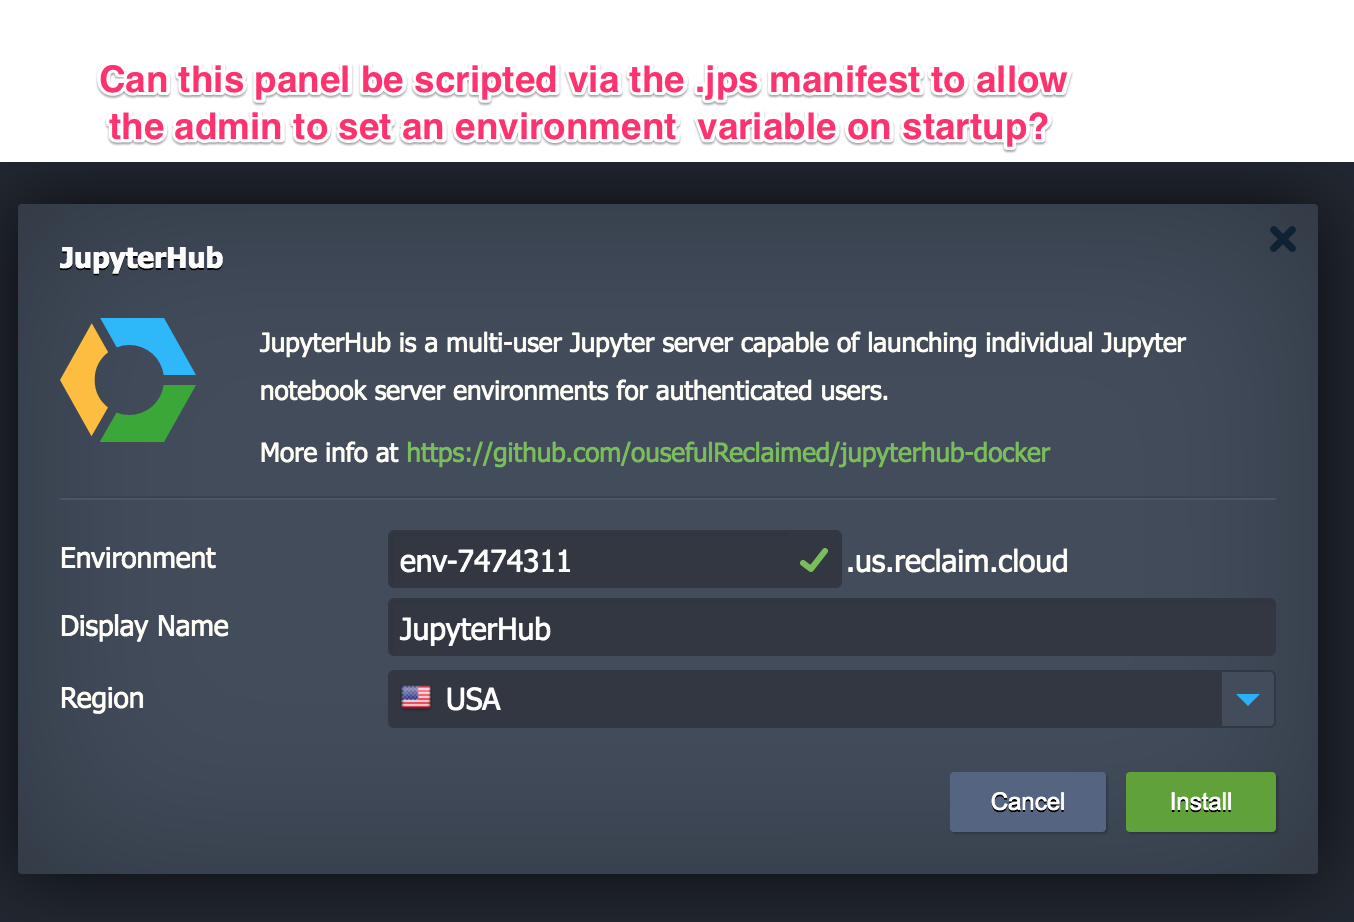
It creates a randomly named admin user along the way to try to make it a little bit more secure. I don’t know if you can inject env vars via the start panel somehow, which might provide another way?
I don’t know if you can inject env vars via the start panel somehow, which might provide another way?
Do you mean via UI of the addon? Check this documentation Visual Settings and many examples in the jelastic-jps repo.